

Chocolate Peanut Butter Cake
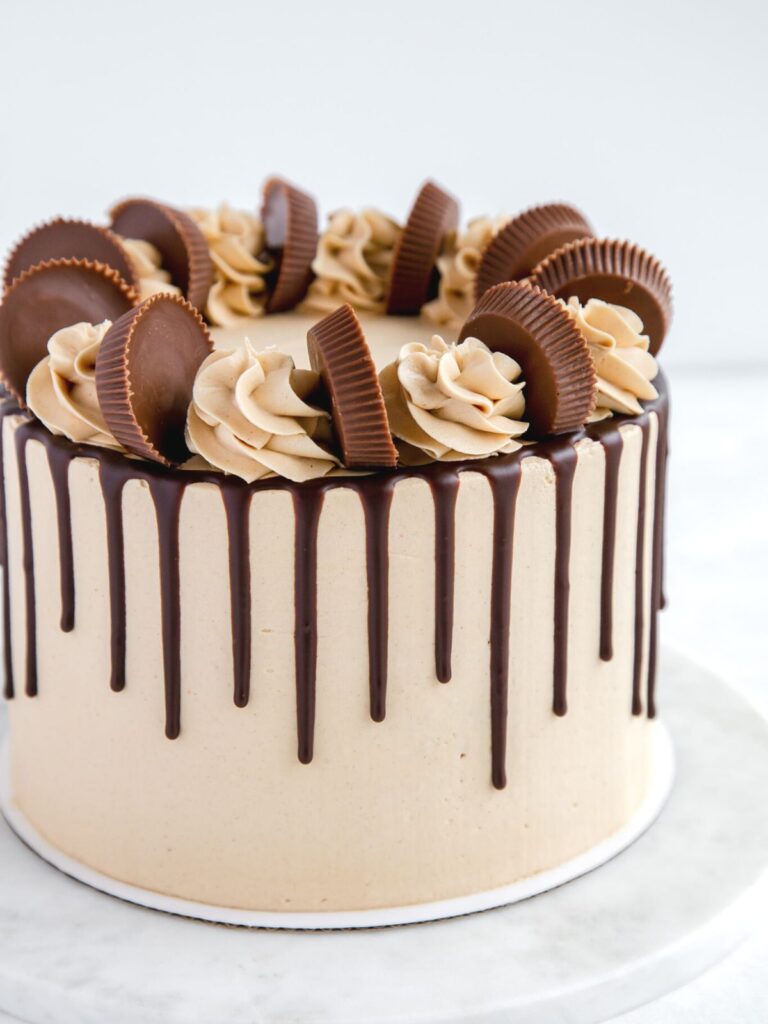
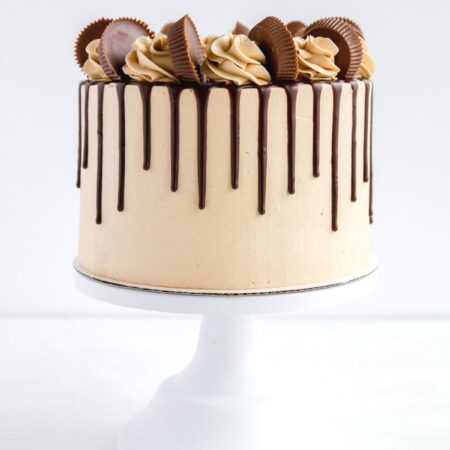
Chocolate peanut butter cake is perfect for Reese’s lovers! Moist dark chocolate cake, creamy peanut butter frosting, chocolate ganache drip, and Reese’s peanut butter cups make this decadent and delicious dessert.

Ingredients for Chocolate Peanut Butter Cake
Chocolate cake
- All-purpose flour
- Granulated sugar
- Dark cocoa powder: Use dark cocoa powder for the best chocolate flavor. My favorite is Hershey’s Special Dark Cocoa Powder which is a dutch-processed cocoa powder.
- Baking soda: A leavening agent to help the cake rise.
- Baking powder: Another leavening agent to help the cake layers rise.
- Salt: Salt enhances the flavor of the chocolate in the cake.
- Milk: Room temperature milk. You can also use buttermilk.
- Eggs: Large eggs, room temperature.
- Vegetable oil: Or your preferred neutral baking oil.
- Vanilla extract: Pure vanilla extract enhances the flavor of the chocolate.
- Boiling water: Boiling water helps bring the batter together.
- Espresso powder: Espresso powder makes the chocolate taste more chocolatey.
Peanut butter buttercream frosting
- Unsalted butter: Room temperature, softened butter.
- Peanut butter: Regular, creamy peanut butter.
- Powdered sugar: Confectioners’ sugar and icing sugar.
- Vanilla extract: Pure vanilla extract adds great flavor to the buttercream.
- Salt: A pinch of salt adds some contrast to the sweetness of the buttercream.
- Heavy cream: Heavy cream or heavy whipping cream makes the buttercream smooth and creamy.
Additional components
- Semisweet chocolate chips + heavy cream = chocolate ganache drip.
- Reese’s peanut butter cups: For filling and decoration.

Tools & Supplies for Making Chocolate Peanut Butter Cake
How to Make the Components for Chocolate Peanut Butter Cake
Chocolate cake
- Preheat oven to 350 degrees F and prepare three 7-inch cake pans with nonstick cooking spray and parchment paper circles.
- In a large bowl, whisk together the dry ingredients (all-purpose flour, granulated sugar, dark cocoa powder, baking soda, baking powder, and salt).
- Add in eggs, milk, vegetable oil, and vanilla extract. Whisk to combine.
- Combine boiling water and espresso powder. Add this mixture to the cake batter.
- Gently stir the cake batter until combined and smooth.
- Pour the batter into the prepared pans. Use a kitchen scale to weigh the batter for even layers.
- Bake the cake layers for approximately 30 minutes.
- Cool the cakes in the pan for 15 minutes before removing and transferring to a wire rack to cool completely.
Peanut butter buttercream frosting
To make the peanut butter buttercream frosting, you will need a stand mixer or an electric hand mixer. If you are using a stand mixer, you can use either the paddle attachment or the whisk attachment – whatever your preference is!
- Whip the room temperature butter for about 5 minutes until light, fluffy, and pale in color.
- Add in peanut butter and mix until well combined.
- Add in half of the powdered sugar and mix on the lowest speed until the sugar is combined with the butter. Then add the remaining half of the powdered sugar and continue to mix on low speed.
- Add the vanilla extract and salt and continue to mix on low until combined.
- Slowly drizzle in the heavy cream. Be sure to scrape the sides and bottom of the bowl after this step to ensure everything is well mixed.
- Turn the mixer to medium speed and whip the buttercream for about 3 minutes.
Chocolate ganache
You can make the chocolate ganache in the microwave or stovetop version! Basically, melt the chocolate with hot heavy cream and stir to create a smooth, shiny ganache.
Assembling the Chocolate Peanut Butter Cake
- Level the cake layers with a serrated knife.
- Place one chocolate cake layer on a round cake board. Add desired amount of frosting to the top of the layer and spread evenly with an offset spatula.
- Sprinkle on half of the chopped Reese’s peanut butter cups. Add a bit more frosting and spread evenly with an offset spatula to lock in the chopped peanut butter cups.
- Add the second cake layer, more peanut butter frosting, remaining chopped peanut butter cups, and spread evenly with an offset spatula.
- Add the final cake layer to the top of the cake. Be sure the bottom of the cake layer is facing up.
- With an offset spatula, add a crumb coat, a thin layer of frosting, to the top and sides of the cake. Use a cake scraper to remove excess buttercream and to smooth the sides. Chill the cake for 20 minutes to firm the buttercream.
- Add a generous layer of frosting to the chilled cake with an offset spatula. Use a cake scraper to remove excess frosting and smooth the sides of the cake. Chill for an additional 20 minutes.
- Use a piping bag or squeeze bottle to add a chocolate ganache drip around the sides of the cake.
- Use a piping bag fitted with a Wilton 1M piping tip to create swirls of peanut butter buttercream around the top edges of the cake with additional peanut butter cups.
Check out my baking tutorial blog post on how to frost a layer cake to learn all of the steps involved in filling, stacking, and frosting a basic layer cake to learn more!

Chocolate Peanut Butter Cake Recipe Tips
Bake perfect chocolate cake
Check out my baking tips blog post on 10 Tips for Baking Perfect Cakes to learn simple tips and tricks to make the most out of this chocolate cake recipe!
Use a large cookie scoop to portion frosting in between cake layers
To create even layers of frosting in between chocolate cake layers, use a large cookie scoop to portion the buttercream! With even layers of buttercream, the cake slices will look stunning!
Don’t skip the crumb coat
I highly recommend doing a crumb coat on this cake before adding the final layer of frosting. A crumb coat is a thin layer of frosting that traps in the chocolate cake crumbs so they don’t show in your final layer of frosting. Be sure to chill the cake for about 20 minutes to firm up the crumb coat before adding the final buttercream layer.
Chocolate ganache drip
The perfect chocolate ganache drip is all about temperature – the temperature of the cake and the temperature of the ganache! You want the cake to be chilled and the ganache to be slightly warm. The warm ganache will be the perfect consistency for dripping and the chilled cake will control the drip.
Storing and serving
Chocolate peanut butter cake can be stored in an airtight container in the refrigerator for up to 5 days. Be sure to cover any exposed cake with plastic wrap to prevent the cake from drying out. To serve, bring the cake to room temperature to soften the buttercream and to have the best taste and texture.

Click here to see a quick video on how to decorate this chocolate peanut butter cake! Follow Cake Me Home Tonight on TikTok, Instagram, and YouTube for more recipe videos and baking tutorials!
 click the stars to rate!
Chocolate Peanut Butter Cake
Ingredients
Chocolate Cake
- 2 cups (250 g) all-purpose flour
- 2 cups (400 g) granulated sugar
- ¾ cup (65 g) dark cocoa powder
- 2 tsp (8 g) baking soda
- 1 tsp (4 g) baking powder
- 1 tsp (6 g) salt
- 2 (2) eggs room temperature
- 1 cup (240 g) milk or buttermilk room temperature
- ½ cup (109 g) vegetable oil
- 2 tsp (8 g) vanilla extract
- 1 cup (237 g) boiling water
- 2 tsp (2 g) espresso powder
Peanut Butter Buttercream Frosting
- 2 cups (454 g) unsalted butter room temperature
- 1 ½ cups (387 g) creamy peanut butter
- 4 cups (480 g) powdered sugar
- 2 tsp (8 g) vanilla extract
- ½ tsp (3 g) salt or to taste
- 2 tbsp (30 g) heavy cream
Chocolate Ganache
- ½ cup (90 g) semisweet chocolate chips
- ¼ cup (60 g) heavy cream
Additional Ingredients
- 8 (8) Reese's peanut butter cups chopped, for cake filling
- 10 (10) Reese's peanut butter cups for decoration
Instructions
Chocolate Cake
- Preheat oven to 350° F. Prepare three 7-inch round cake pans using cooking spray and parchment circles.
- In a large mixing bowl, whisk together all-purpose flour, granulated sugar, dark cocoa powder, baking soda, baking powder, and salt.
- Add in room temperature eggs, milk, vegetable oil, and vanilla extract. Whisk until the dry and wet ingredients are combined.
- All espresso to boiling water. Pour boiling water into the cake batter and gently whisk until the water and cake batter are combined and smooth.
- Divide cake batter between the three prepared 7-inch cake pans. Use a kitchen scale to create even layers.
- Bake cakes for approximately 30 minutes in the oven until the cakes spring back when gently touched or toothpick comes out clean.
- Remove pans from the oven and allow the cake layers to cool in the pan for about 15 minutes before transferring to a wire rack to cool completely.
Peanut Butter Buttercream Frosting
- In a large mixing bowl or the bowl of a stand mixer fitted with a whisk or paddle attachment, add in room temperature unsalted butter. Whip the butter for 5 minutes on medium-high speed, scraping down the sides occasionally. The butter will be light, fluffy, and pale in color.
- Add in the creamy peanut butter and continue to mix until well combined.
- Add one half of the powdered sugar and mix on the lowest speed setting until fully combined. Add remaining powdered sugar and continue to mix on low until incorporated.
- Add vanilla extract and salt and mix on low until combined.
- Drizzle in the heavy cream while mixing on low. Scrape the sides of the bowl occasionally to ensure the frosting is well mixed.
- Once the heavy cream is added, turn the speed on the mixer to medium and whip for an additional 3 minutes scraping the sides and bottom of the bowl occasionally.
Chocolate Ganache
- Add chocolate chips to a heat-safe bowl.
- Heat heavy cream in a microwave-safe bowl for 30-60 seconds until bubbling.
- Pour the hot heavy cream over the chocolate chips and allow the mixture to sit for two minutes to melt the chocolate.
- Stir until the chocolate ganache is smooth and shiny. Cool slightly and transfer to a squeeze bottle or piping bag to create the chocolate ganache drip.
Assembling the Chocolate Peanut Butter Cake
- Level the cooled chocolate cake layers with a serrated knife.
- Place one chocolate cake layer on a round cake board. Add desired amount of frosting to the top of the layer and spread evenly with an offset spatula. I like to use a large cookie scoop to portion the buttercream for even layers of frosting between cake layers. Add on half of the chopped Reese's peanut butter cups. Add additional frosting and smooth with an offset spatula.
- Add the second cake layer, more peanut butter frosting, the remaining chopped peanut butter cups, a bit more frosting, and spread evenly with an offset spatula.
- Add the final cake layer to the top of the cake. Be sure the bottom of the cake layer is facing up.
- With an offset spatula, add a crumb coat, a thin layer of frosting, to the top and sides of the cake. Use a cake scraper to remove excess buttercream and to smooth the sides. Chill the cake for 20 minutes to firm the buttercream.
- Add a generous layer of frosting to the chilled cake with an offset spatula. Use a cake scraper to remove excess frosting and smooth the sides of the cake. Chill for an additional 20 minutes.
- Use a piping bag or squeeze bottle to add a chocolate ganache drip around the sides of the cake. Pour additional chocolate ganache on the top of the cake an use an offset spatula to spread evenly.
- Use a piping bag fitted with a Wilton 1M piping tip to create swirls of peanut butter buttercream around the top edges of the cake. Add peanut butter cups for decoration on the top of the cake.
Notes
Made This Recipe?
Please leave a comment with a star rating to let me know how you enjoyed the recipe!

About Courtney
Baker | 80s Lover | Cookbook Author
Courtney is a self-taught home baker and cookbook author of “Girls Just Wanna Bake Cupcakes”. She loves to create new and unique recipes while simultaneously listening to 80s music.


Hey I was wondering if I doubled the recipe if I used 3 8inch cake pans that the layers would be the same thickness
Doubling the recipe would be a bit too much for 3 8-inch pans. You may be able to double with 3 9-inch pans. Or, after filling the pans about halfway, use any excess batter to make cupcakes!
By far one of my favorite recipes! That peanut butter frosting is to die for!! I ended up doing 2 8 inch square pans. I also crushed peanut butter cups and put them in between the layers! It was my first time with the ganache. Mine came out a little too thin so I’ll probably add the cream to the chips a little at a time until I get the consistency I want. Thank you for sharing!!
I’m so happy to hear you are loving this recipe! 🙂
WARNING!! DO NOT ATTEMPT TO PRINT FROM THE FIRST PAGE!! YOU WILL GET 30 PAGES INCLUDING COMMENTS (AND EMPTY YOUR PRINTER INK) I wanted a recipe, not the whole darn book.
Oh goodness! That is so frustrating! I’m so sorry that happened! If you just want to print the recipe, you will want to press the “print” button on the recipe card only. The “print” button at the top of the page prints the entire blog post. My apologies.
How tall is the cake when it is finished with the Reese’s on top?
Hi Amanda! I’ve actually never measured the height of the decorated cake, so I can’t say for certain exactly how tall it is. An educated estimate would be about 9-10 inches tall.
I can’t find an airtight cake container that is tall enough, but I don’t know how to keep it fresh without one.
Ah! Gotcha! Another option could be a tall cake box. If that is not an option, you could chill the cake until the buttercream and ganache are very firm and very gently cover the cake with plastic wrap – it doesn’t have to be perfect. Just be sure to pull off the plastic wrap immediately when you take it out of the fridge so it doesn’t mess up the cake design.
Thanks so much! I love this website- all the recipes are so creative and look AMAZING!
I made this cake as a belated Valentine’s Day treat and it went down a storm! Moist cake, perfect icing. I used just boiling water (no espresso powder) purely because I knew my young children would want a slice. I have never made ganache before, found it to be a tad thick but likely down to the temperature in the room from what I have read? It was nice and shiny though so I was pleased. Not sure on technique for a good ‘drip’ but so happy with my first attempt. Thank you so much!
Thank you so much for trying the recipe! I’m thrilled to hear that you enjoyed the cake! The ganache drip can definitely be tricky and yes, temperature can certainly impact it. I appreciate you leaving a positive review and comment!
Can I make cupcakes with this recipe?
Hi there! I haven’t tested this recipe as cupcakes, so it is difficult to say, but I don’t see why it wouldn’t work!
Hi! I was wondering if this cake could be made with 3 8 inch pans or 4 6 inch pans? I only have 8 inch and 6 inch pans to work with
Hi Sierra! Absolutely! You could either size pans. The three 8-inch would just make slightly thinner layers. The bake times may vary slightly, so keep your eyes on the oven!
I am looking at the recipe and I’m right in the middle of making it but I don’t see how much boiling water. Could you please share that with me so I can finish making this cake please and thank you
Hi Kat! It is 1 cup of boiling water in the cake batter.
Would this work if I omitted the espresso powder?
Yes, that would be fine! It won’t change the recipe much – just enhances the chocolate flavor a bit!
I made this and it was amazing!! Would this be god with a yellow cake mix?
So glad you enjoyed the recipe! As long as you like yellow cake with peanut butter frosting, sounds good to me!
Our son requested chocolate cake with peanut butter frosting for his 30th birthday, so I made my usual dark chocolate cake, but the rest of it was all your recipe. The frosting is divine! I made a 4 layers cake and had even a little frosting leftover- perfect!
Thanks for this great recipe!
Hi Nancy! Thanks so much for trying out this recipe! Chocolate peanut butter cake is the best way to celebrate a 30th birthday!!
My whole fam loved it!
So thrilled to hear! Thanks for trying the recipe!!
I ran into the issue of the Peanut buttercream frosting. My forsting is very oily and difficult to work with. Can you please any tips on fixing my issue with the frosting?
Hi there, Madeline! So two things come to mind. The butter might be too soft or the brand of peanut butter you are using might be a bit more on the oily side.
Good Afternoon,
If you do not mind can I ask what name brand of peanut butter do you use for this recipe?
I used Skippy Creamy Peanut butter
Thank you
Madeline
Hi Madeline! When I made this recipe, I used Great Value peanut butter which is the Walmart brand.
Thank you. I tried the recipe again with the Jif peanut butter and it worked great. I believe I did not allow the butter to soften completely and did not whip the butter until creamy. It made a great difference with completely soften butter and whipping the butter until it is fluffy and creamy. The frosting is prefect unlike the first try. The first try it was lumpy and very oily. I realized right away there was something I did wrong.
The cake has the prefect taste and moisture; everyone in my family loved it.
thank you for your support.
Madeline
So glad to know that the cake turned out great on the second try! So happy to hear you enjoyed the recipe!!
Question 🙂 the measurement for cocoa says metric 65g but I usuallly go with 85-90g for 3/4 cup. When I put it in a measuring cup to check after I weighed it it was closer to 2/3. I’m trying the double dark cocoa. I’m going with 75 to be in between. I like to go with weight to make sure I have everything measured correctly. Is that number under? Thanks 🙂
Side note, using the King Arthur double dark cocoa.🍫
Hi there! I write all my recipes in imperial measurements and they are converted automatically into metric. It is tough for me to say which one is the most accurate! But I hope it worked out for you! 🙂
What is a crumb coat?
A crumb coat is a thin layer of frosting that traps in the cake crumbs. If you make a crumb coat, chill the cake, and then add a final layer of frosting, there will be no crumbs showing through! I have a great blog post on How to Frost a Layer Cake for more information!