

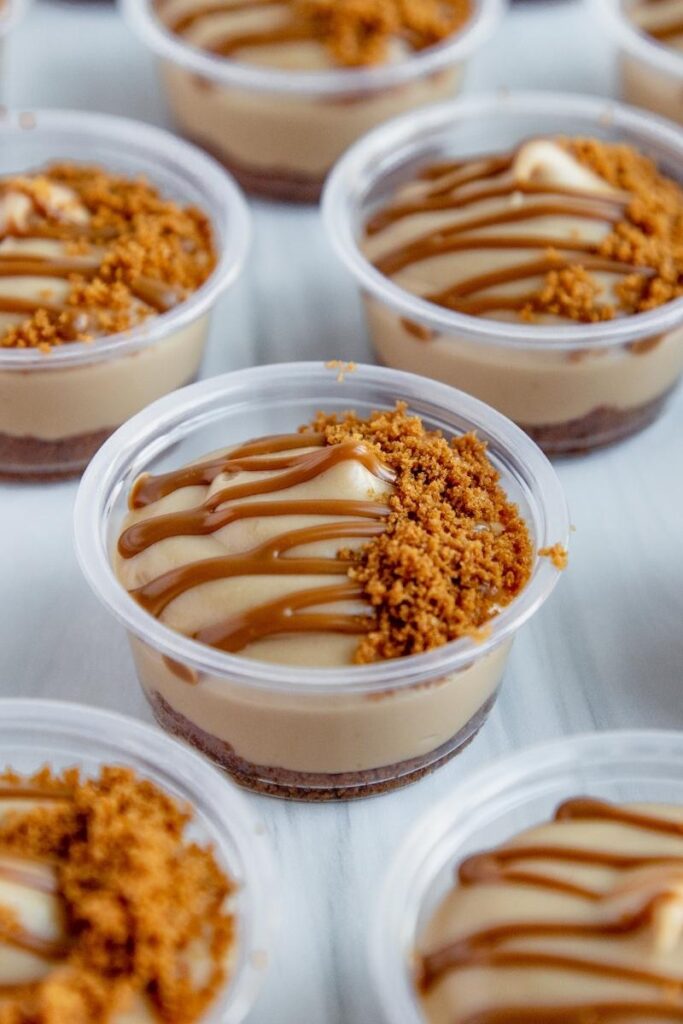
Biscoff Dessert Cups
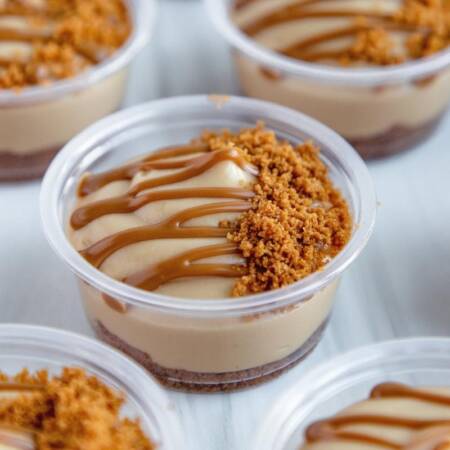
Biscoff dessert cups are perfect for cookie butter lovers! A biscoff cookie crust filled with cookie butter no bake cheesecake filling, drizzled with more cookie butter and sprinkled with biscoff cookie crumbs. An easy, no bake treat perfect for parties!
Biscoff Dessert Cups
Are you as obsessed with Biscoff recipes as I am? Biscoff ice cream, Biscoff cakes, Biscoff brownies, Biscoff blondies, Biscoff cupcakes…give me ALL the Biscoff desserts!
These Biscoff dessert cups have layers and layers of Biscoff deliciousness. The crust is made from Biscoff biscuits (cookies), layered with Lotus Biscoff cheesecake filling, and topped with a drizzle of cookie butter and cookie crumbs.
Take a shot every time I say Biscoff in this blog post.
Ingredients for Biscoff Dessert Cups
- Biscoff cookies – Lotus biscoff cookies have a delicious, nutty, caramel flavor with notes of cinnamon. For this recipe, you will want to use a food processor to grind the cookies into fine crumbs. These cookies can also be known as speculoos cookies. Biscoff crumbs are used for the crust and also to sprinkle on the top of the dessert cups.
- Unsalted butter – Melted. You can use salted if your prefer.
- Cream cheese – Room temperature cream cheese for easy creaming. I recommend using full-fat cream cheese.
- Granulated sugar – To sweeten things up a bit.
- Vanilla extract – Vanilla extract adds great underlying vanilla flavor to the biscoff cheesecake filling.
- Cookie butter – Lotus biscoff spread or biscoff cookie butter is made from biscoff cookies. It is a spreadable version of biscoff cookies with a nutty, caramel flavor. Cookie butter is used in the cheesecake filling and also drizzled over the top of the dessert cups.
- Heavy cream – Helps the mixture whip up to be light and fluffy.
Tools & Supplies to Make Biscoff Dessert Cups
How to Make Biscoff Dessert Cups
To make this recipe, you will need an electric hand mixer or a stand mixer fitted with a whisk attachment.
- Mix together biscoff cookie crumbs and melted butter.
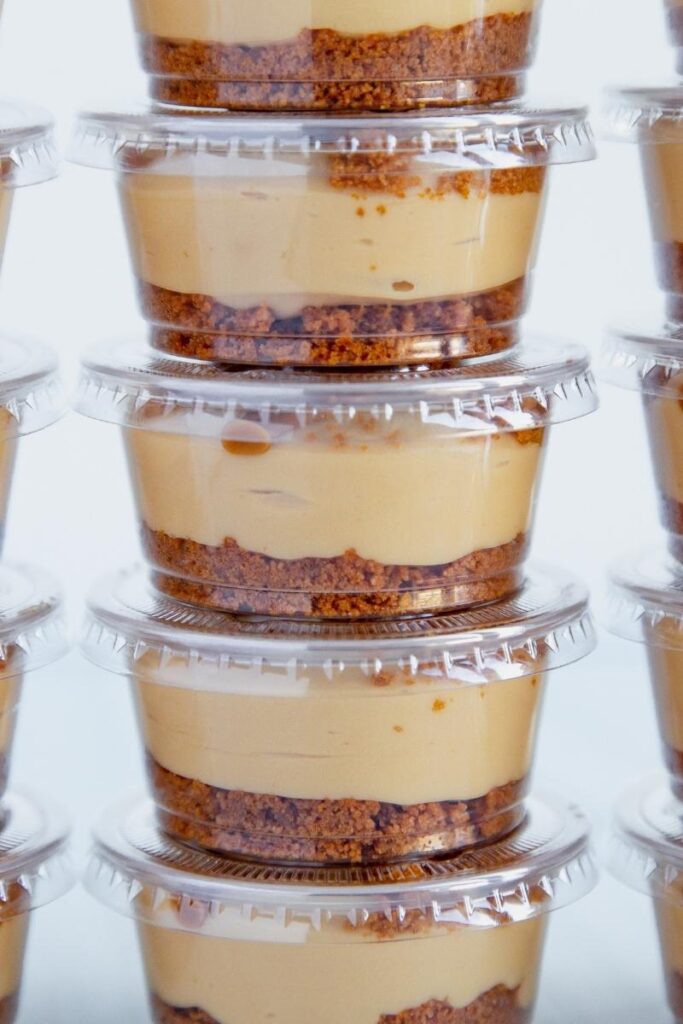
- Portion the crumbs into 28 2-ounce plastic cups using a small cookie scoop. Use one of the plastic cups to press the crumbs into the bottom of the cup.
- With an electric mixer, cream together cream cheese, granulated sugar, and vanilla extract, until combined and smooth.
- Add cookie butter to the cream cheese mixture and continue to mix until combined.
- Add in heavy whipping cream and whip on medium-high speed until light and fluffy.
- Fill a piping bag with the cookie butter mixture. Pipe the mixture into the cups until about 3/4 full.
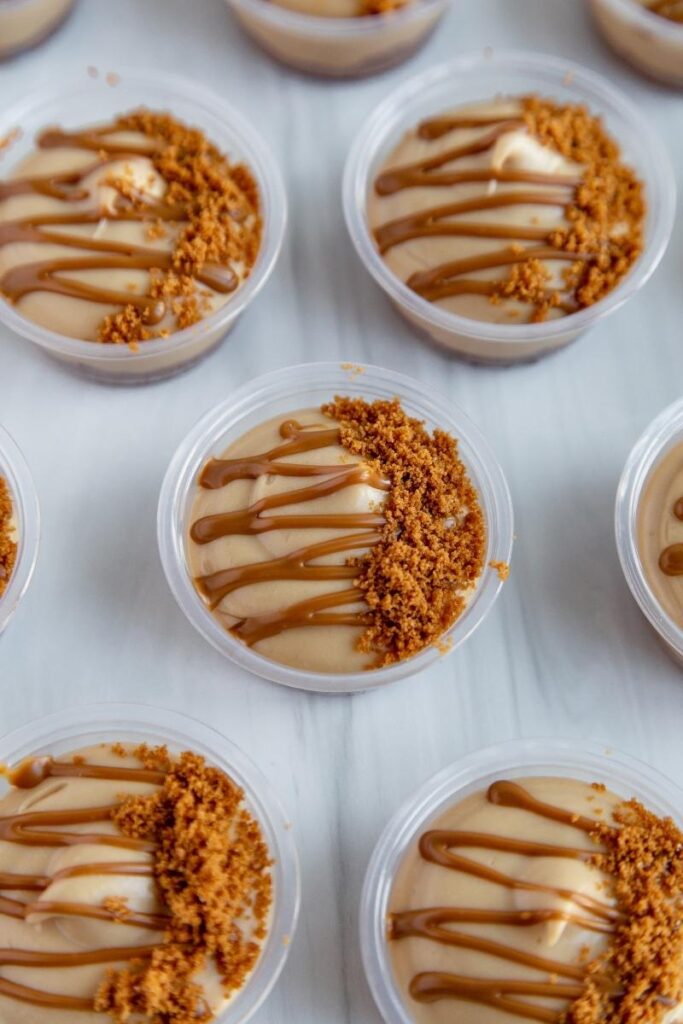
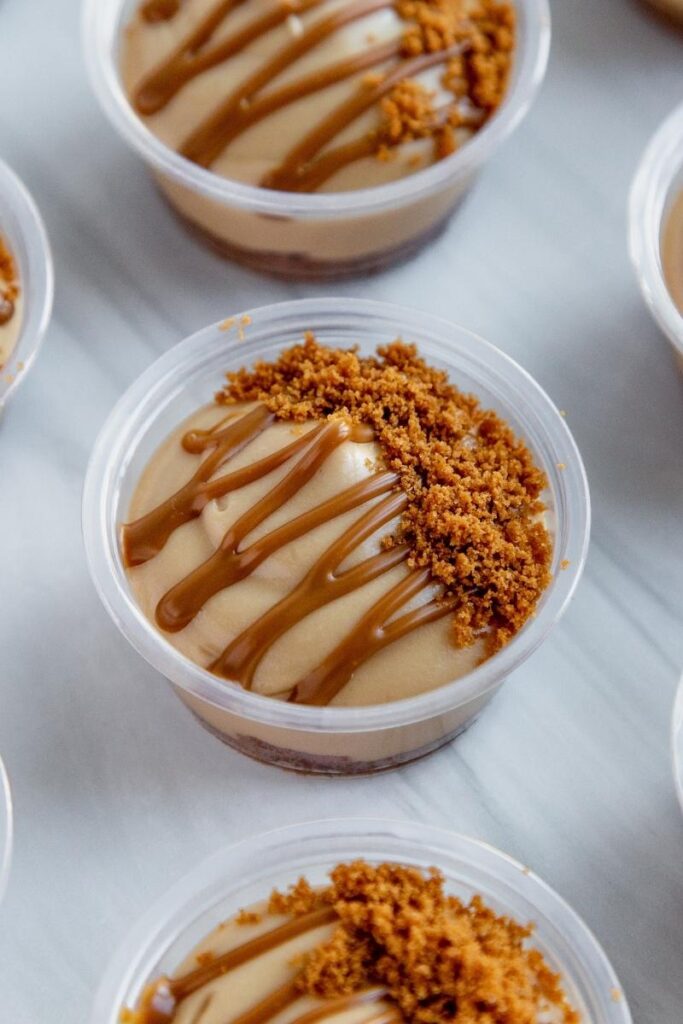
- Heat the additional cookie butter in the microwave to loosen up the consistency. Use a piping bag or squeeze bottle to drizzle the cookie butter over the cookie butter mixture. Sprinkle with additional biscoff cookie crumbs.
- Seal the cups with a lid and chill. The cups can be served immediately or stored in the refrigerator for 2-3 days.
Biscoff Dessert Cups Recipe Tips
Plastic cups
Find the plastic cups with lids on Amazon or at your local party supply store. You can also use cupcake liners if you wish!
Yield
This recipe makes approximately 28 2-ounce cups. This is an estimation. You may have a few more or a few less depending on how much filling you pipe into the cups!
Biscoff cookie crumbs
Use a food processor to make the biscoff cookie crumbs. You can also place the cookies into a sealable plastic bag and crush them with a rolling pin or other appropriate object! Be sure the crumbs are very fine for best results!
Biscoff drizzle
To make the biscoff drizzle, be sure to heat the biscoff spread in the microwave for about 10 seconds to loosen up the consistency and make it perfect for drizzling. Use a piping bag or squeeze bottle to drizzle the cookie butter over the dessert cups.
Storing and serving
Store the dessert cups in the refrigerator for about 2 to 3 days. I love serving these dessert cups right out of a cooler at parties or picnics! The dessert cups can stand out at room temperature for about an hour.
Click here to see a quick video on how to make Biscoff dessert cups! Follow Cake Me Home Tonight on TikTok, Instagram, and YouTube for more recipe videos and baking tutorials!
 click the stars to rate!
Biscoff Dessert Cups
Equipment
- 28 2-ounce plastic cups with lids
Ingredients
Biscoff Cookie Crust
- 2 cups (473 g) biscoff cookie crumbs
- ¼ cup (56 g) unsalted butter melted
Cookie Butter Filling
- 8 ounces (226 g) cream cheese room temperature
- ¾ cup (150 g) granulated sugar
- 1 tsp vanilla extract
- ¾ cup biscoff spread cookie butter
- 1 ½ cups (357 g) heavy cream
Toppings
- 2 tbsp biscoff spread cookie butter, melted slightly
- ¼ cup biscoff cookie crumbs
Instructions
- In a small bowl, combine biscoff cookie crumbs and melted butter. Mix to combine.
- Portion the crumbs into 28 2-ounce plastic cups using a small cookie scoop or spoon. Use one of the plastic cups to press the crumbs into the bottom of the cup.
- In a large mixing bowl, cream together cream cheese, granulated sugar, and vanilla extract until smooth. Add biscoff spread and mix until smooth.
- Pour in heavy whipping cream and whip on medium-high speed until light and fluffy.
- Fill a piping bag with the cookie butter mixture. Pipe into the cups until about 3/4 full.
- Place remaining biscoff spread into a microwave-safe bowl. Heat for about 10 seconds to melt the biscoff spread slightly. Pour the melted biscoff spread into a piping bag or squeeze bottle and drizzle over the top of the cups. Sprinkle on additional biscoff cookie crumbs.
- Seal the cups with a lid and chill. The cups can be served immediately or stored in the refrigerator for 2 to 3 days.
Notes
Made This Recipe?
Please leave a comment with a star rating to let me know how you enjoyed the recipe!

About Courtney
Baker | 80s Lover | Cookbook Author
Courtney is a self-taught home baker and cookbook author of “Girls Just Wanna Bake Cupcakes”. She loves to create new and unique recipes while simultaneously listening to 80s music.


Delicious recipe! I made no changes and followed the steps. When it was the step to whip the whipping cream in, I changed the paddle on my stand mixer to the whisk. No problem getting it to the whip/thicker consistency. This recipe is a keeper. Thanks so much!
Hi Deidre! So glad you enjoyed it! Thanks for the positive review!
These are very good. How many ounces, or what amount
of cookie crumbs per cup? Mine were good, but not uniform.
Thank you!
Hi Sally! I use a small cookie scoop to help me portion out the cookie crumbs which equals about 1 tablespoon.
does this freeze well without the topping?
Yes! They freeze great!
Can’t wait to try this simple recipe!
Quick question: Am I supposed to whip the heavy cream separately and then fold it into the cream cheese mixture? Or combine the cream cheese and biscoff and then pour in the liquidy heavy cream?
Hi Sam! You pour the heavy cream right into the cream cheese/biscoff mixture. Whip it up for a few minutes and it will become smooth and thick! Hope you enjoy!
Can these desserts cup fillings be used as cupcake fillings or even icing for cupcakes?
Hi Deidre! Yes, you can absolutely use them as cupcake fillings. Some of the dessert cup fillings have a bit of a looser consistency, but as long as they are thick enough, you could certainly use it for cupcake icing.
The filling tastes great but mine came out really soupy and I’m not sure why!
Hi Krina! You probably need to whip the filling for longer. At first, it’s really thin, but it should thicken up and have a mousse-like consistency.
How many minutes should we whip the mixture?
Hi Sally! In my experience, it is usually about 3 to 5 minutes.
Hi,
planning to make these for my daughters 1st birthday desert table
do they taste like cheese? Ive never been a fan of cheesecake but ik more people like them.
I personally don’t think they taste like cheese personally, but I know some people feel that way about cheesecake. I think the biscoff flavor is really prominent to cover up any cream cheese flavor.
Can this be made in/as a whole pan?
Hi Sherry! Yes it can! You can essentially turn it into a no bake cheesecake. I would recommend using a deep 8 or 9 inch pan.
Hello! I’m looking to make this recipe but only have powdered sugar on hand. Does it make a difference whether you use powdered or granulated? I assumed powdered would have a smoother consistency
Hi Dhuha! You can use either one and it will work out perfectly well!
I have enjoyed making all of your dessert cup recipes. I make them for the faculty and staff at the school I teach at every Thursday evening. A sweet treat on a Friday for amazing teachers and staff. Thank you for sharing.
Rachel, I’m so happy to hear that you have been enjoying my dessert cups! They are the perfect little bite when you just need a little something sweet! Summer is coming, so I will be adding a whole bunch of new flavors!
Hi,
How far in advance can I make the filling before assembling? I’d like to make the filling in advance and take it out of the fridge when I need it.
Hi there! I’m not exactly sure as I haven’t done that before and I’m not sure if I would recommend it. The filling sets up a bit as it sits and chills, so if you were to pipe it after a day or two, the consistency might not be as smooth and creamy. Once piped, I’ve kept these in my fridge for 5 days without a problem!
Hi! Can you just make this in a regular size glass pie pan? Wasn’t sure how well it would chill or if it would take longer considering it’s a bigger amount together. Thanks for your time!
Sure can! You can essentially make it into a no bake cheesecake type situation. I’m not sure how the ingredients would fit in a regular size pie pan. You might need two 🙂
Hi there! Can these be made with whipped cream instead of cream cheese? If so, how much whipped cream would be required?
Hello! I haven’t specifically tested this recipe with just using whipped cream so it is difficult to say how that would work and how much would be needed. I do make several of my dessert cup recipes with a pudding base – You would need a package of instant pudding mix (for this, I would go with vanilla), 1 1/2 cups milk, and 1 1/2 cups heavy cream. Mix together the pudding and milk and chill for 5 minutes. Then, add the heavy cream and whip until thickened. You could add the biscoff to this mixture. Again, I haven’t specifically tested this, but my instinct is that it would work out! 🙂