

How to Make Hot Chocolate Bombs
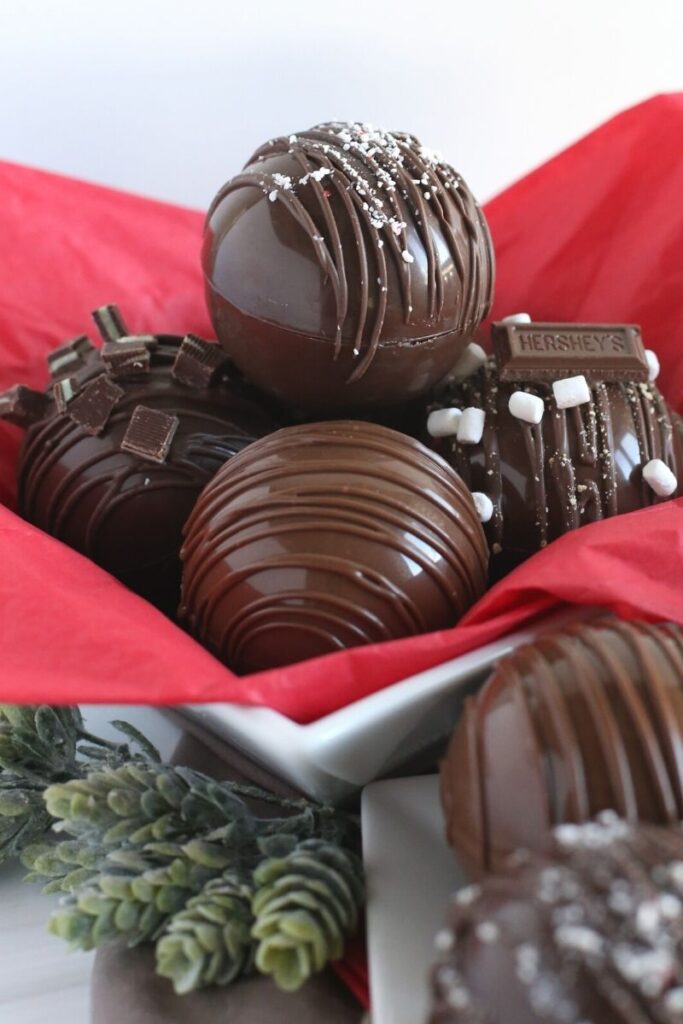
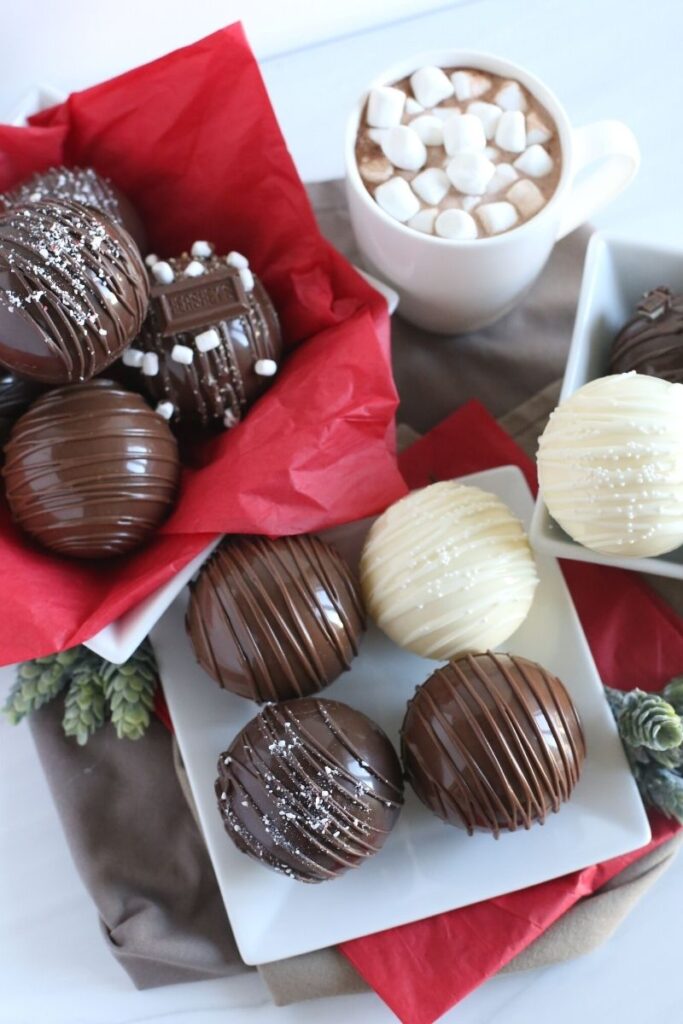
Hot chocolate bombs are all the rage for the holidays! Hot chocolate mix and mini marshmallows encased in a chocolate shell. Simply pour hot milk over the hot cocoa bombs and watch the magic happen! In this post, I will share with you how to make hot chocolate bombs, the supplies you need to make them, and tips to make the process easy and fun!

What are Hot Chocolate Bombs?
Hot chocolate bombs came on the scene in 2020. At least that is when they came to my attention! I don’t know about you, but I couldn’t pull up social media without being inundated with people frantically searching for bombs for the holidays!
They seemed simple enough to make – chocolate, hot chocolate mix, and marshmallows. On my first shot making them, it was quite a disaster, but an excellent learning experience. I made adjustments and we were off the races. I made close to one thousand bombs in 2020!
That being said, I clearly have a bit of experience making chocolate bombs. Although they require a bit of practice, the process is not incredibly difficult. Practice makes perfect!
I want to share with you the supplies you need, how to make bombs, and tips I have learned along the way to make the bomb making process easy! Follow these steps, and you will make the best hot chocolate bombs.
Be sure to check out my blog post on delicious hot chocolate bomb flavors once you get the hang of the basic technique!

What You Need to Make Hot Chocolate Bombs
(NOTE: In 2022, I was introduced to a beautiful and magical creation of a three-piece chocolate mold as opposed to a silicone dome mold. I have updated by supply list as the three-piece mold is significantly easier to use, cleaner, and produces better bomb shells).
- Three-piece chocolate mold: This is the key to making hot chocolate bombs easy! Chocolate Mold Co gifted me a three-piece mold and I will never go back to silicone molds! All you need to do is add melted chocolate to the bottom of the mold, place the insert into the chocolate and add the top mold. The chocolate shells pop right out! I highly recommend checking out Chocolate Mold Co‘s website to purchase your molds. Click here to purchase the exact ones I use! (not an affiliate link).
- Chocolate: To make the chocolate bomb shell, you will need chocolate!. You can use milk, dark, or white chocolate. My absolute favorite chocolate to use is Merckens Chocolate Wafers. Delicious and easy to work with! And no tempering required (my favorite part).
- Hot chocolate: Use your favorite hot cocoa mix! Milk chocolate, dark chocolate, or any type of flavored hot chocolate you would like! My two favorite brands are Swiss Miss and Ghirardelli.
- Mini marshmallows: How can you have hot chocolate without marshmallows? Mini marshmallows explode out of the chocolate shell when it melts. I love using a combination of mini marshmallows and dehydrated marshmallows.
- Plate: To seal the chocolate bombs, a heated plate helps melts the edges of the chocolate so the two halves of the sphere stick together. Just a small dessert size plate will do.
- Piping bag: I love drizzling some extra chocolate over the bombs. Use a piping bag for easy drizzling.
How to Make Hot Chocolate Bombs
Hot chocolate bombs take a little bit of practice. The steps are relatively simple but making them look clean and smooth without any holes or gaps takes a bit of practice.
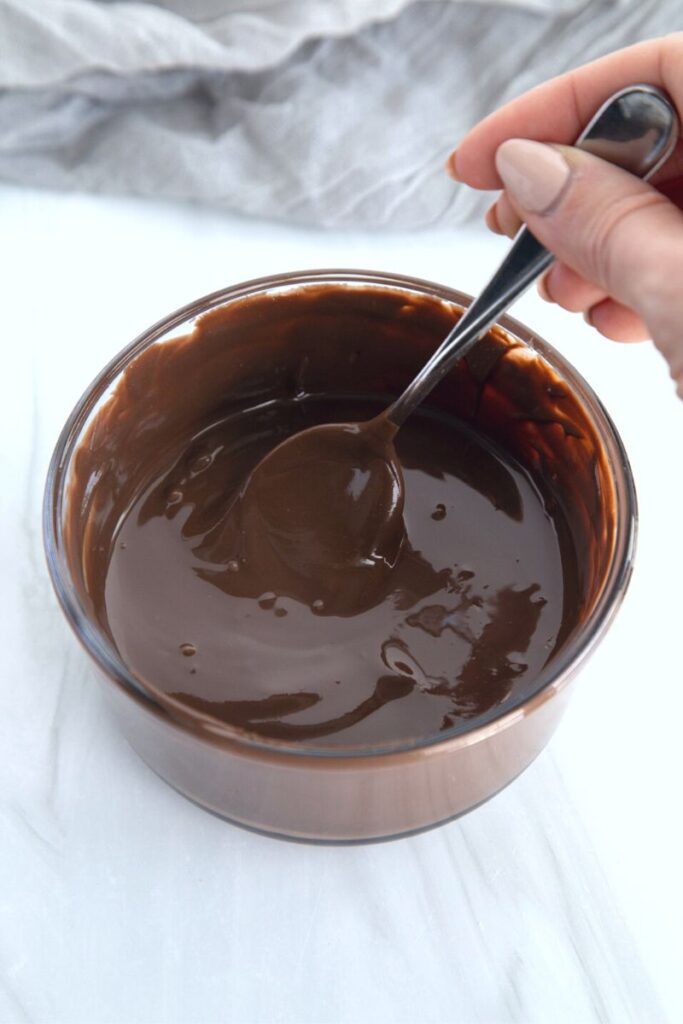
- Melt chocolate: Place your desired amount of chocolate in a microwave-safe bowl and melt. (See below how to melt chocolate in the microwave)!


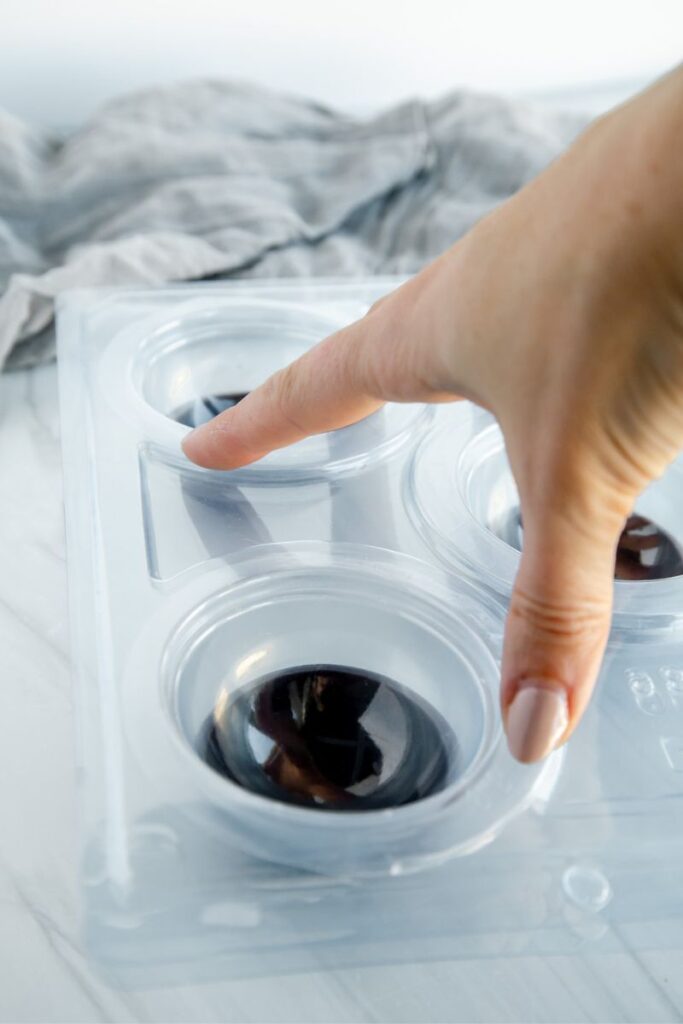
- Mold: Spoon the melted chocolate into the bottom of a three-piece dome mold. Place the small inserts on top of the melted chocolate inside of the mold. Add the top mold and press down. The chocolate will spread and even out. Be sure that the chocolate fills the mold to the top so there are no gaps in the edges.


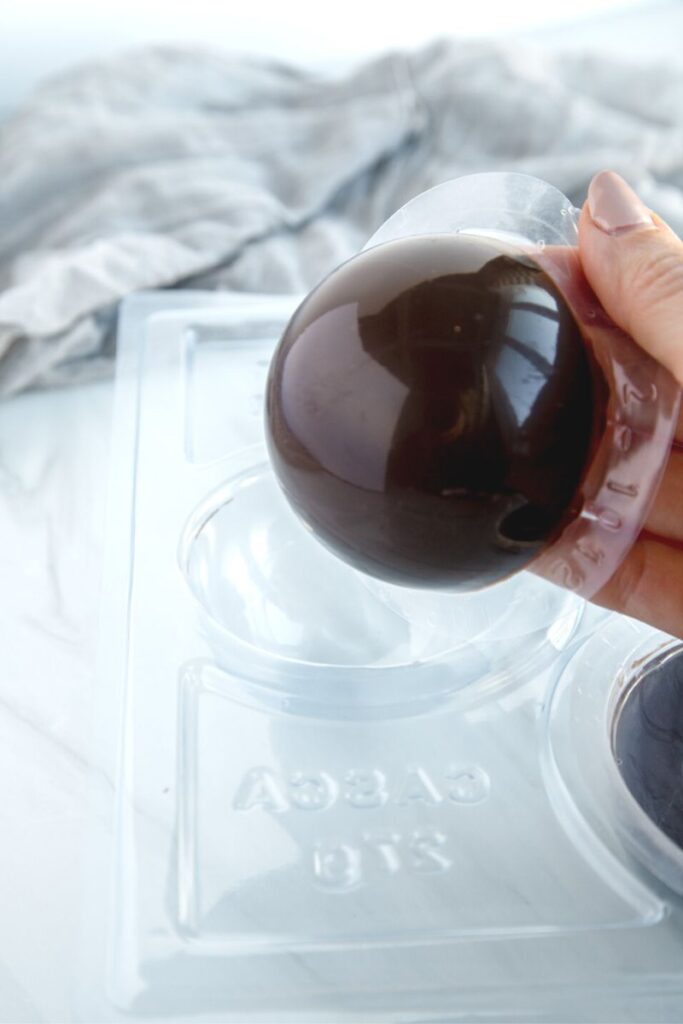
- Chill: Chill the chocolate mold in the refrigerator for about 5 to 10 minutes until the chocolate solidifies.
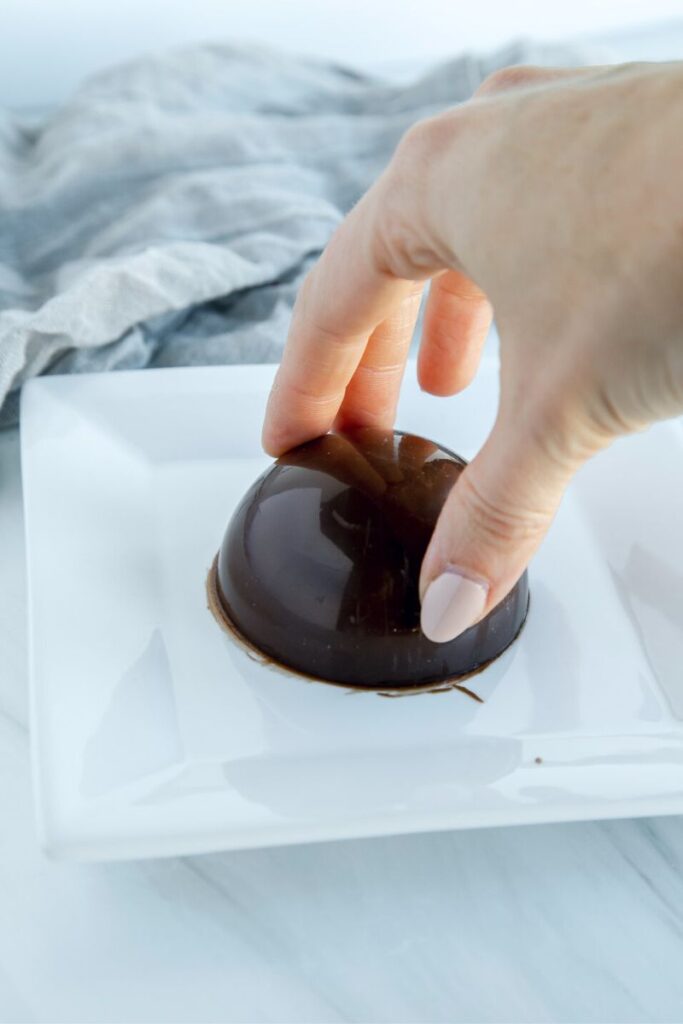
- Remove: Very gently remove the chocolate half spheres from the mold. Pull the small inserts out and gently peel it away from the chocolate shell. Clean up the edges of the shell on a hot plate if needed.
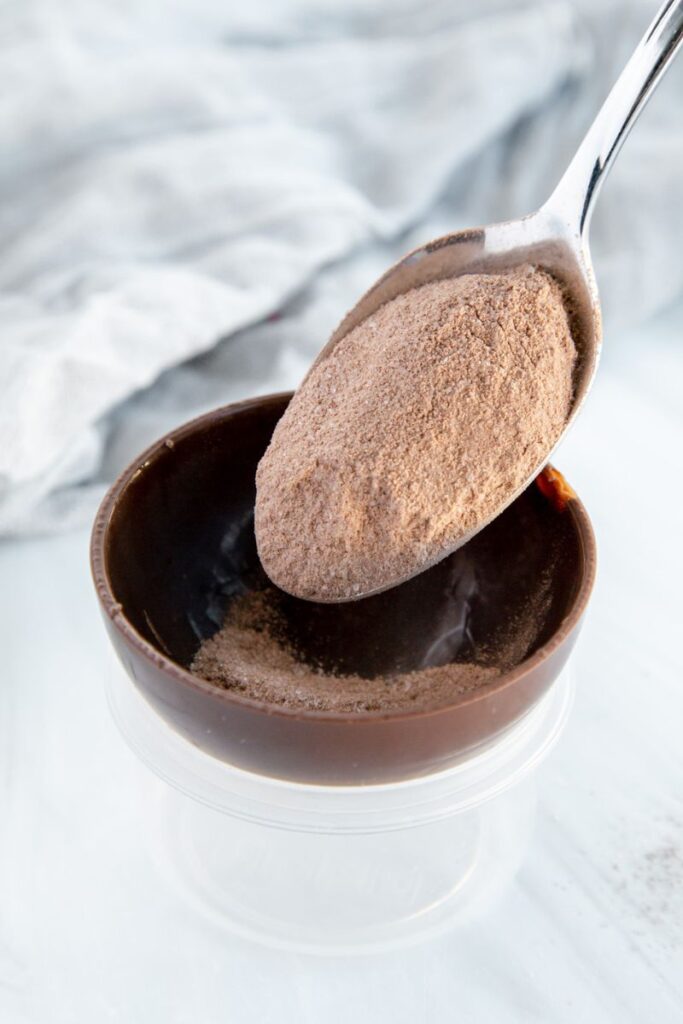
- Fill: Fill half of the chocolate shells with a heaping tablespoon or two of hot chocolate mix. Add in a handful of mini marshmallows and/or dehydrated marshmallows.

- Melt the edges: Heat a microwave-safe small plate in the microwave for 60 seconds. One at a time, quickly and gently place the edges of the empty chocolate shells on the plate and swirl to melt the edges of the chocolate.


- Seal: Quickly place the empty shell on top of the filled shell to seal the edges and create a dome.
- Drizzle: Fill a piping bag with additional melted chocolate and drizzle over the chocolate spheres. Feel free to add on extras like sprinkles, mini chocolate chips, or crushed peppermint candy.
Tempering Chocolate
Tempering chocolate is the process of melting chocolate so that when it firms up, the chocolate is shiny and snaps when cracked. The process of tempering the chocolate will help the bombs appear shiny, smooth, and firm.
Liz Marek from Sugar Geek Show has an amazing blog post on how to temper chocolate two different ways using the microwave! I highly recommend checking out this post to learn more about tempering chocolate!
Don’t want to temper your chocolate?
I use Merckens Coating Melting Wafers. These coating melting wafers are commonly used by candy makers to enrobe candies with chocolate. It has amazing chocolate flavor and does not require tempering. This type of chocolate is similar to candy melts but with amazing chocolate flavor.
To melt, simply pour the wafers into a microwave-safe bowl, and heat in 30 second increments, mixing in between each interval until the chocolate is fully melted. Be careful not to overheat as the chocolate can seize up. Be sure to mix very well in between each interval in the microwave to promote melting.
No need to temper. Easy to work with. Shiny and snaps when cracked. Doesn’t melt the moment you touch it. I’m all in for that!

Why is there no recipe and no amounts for ingredients?
I am not sharing a recipe with exact measurements for ingredients because it is nearly impossible to do. The ingredient amounts can vary so much depending on the size of your molds, personal preferences, and how many bombs you are making.
Be gentle when removing the chocolate shells from the mold
To remove the shells from the mold, first remove the top mold. The small inserts have a lip around the top so you can pull on the lip to remove the chocolate shell. Be slow and gentle with this step to prevent breaking. Once the shell is out of the mold, carefully pull the insert out of the shell. I like to gently pull the insert from the sides around the edges before pulling out the insert.
Clean up the edges of the chocolate shells before filling
Before sealing the hot chocolate bombs, it may be necessary to clean up the edges if there is any excess chocolate or bumps. Simply heat a plate for 60 seconds in the microwave and quickly place the dome on the plate to melt the chocolate. The edges will be smooth and even.
Use gloves to prevent fingerprints or smudging
To prevent fingerprints from messing up the shiny shells, gloves can be a helpful supply to have on hand. Literally and figuratively. You can also run your hands under cold water to prevent any smudging or melting as well! It is best to work quickly and minimize the amount of time you are handling the shells.
Use a small bowl or container to stabilize the shells
Before filling the chocolate shells with hot chocolate mix, I love to perch them on a very small bowl or container to stabilize them for easy filling and sealing. I have small, 2-ounce salad dressing storage containers that are the perfect fit for this size bomb.
Storing hot chocolate bombs
The hot chocolate bombs are shelf stable, as all of the ingredients can be kept at room temperature. I recommend storing the bombs in an airtight container or wrapped in a cellophane treat bag. Keep the bombs in a cool, dry, and dark place ideally, like a pantry or kitchen cabinet. Heat and light can damage the chocolate. I do not recommend keeping the hot chocolate bombs in the refrigerator or freezer. The bombs will be great for about a month!

How to Make Hot Chocolate from the Hot Chocolate Bombs
Heat 8 to 10 ounces of your milk of choice. In the microwave, usually 2 minutes is perfect.
Choose your own adventure:
- Place the hot chocolate bomb in the bottom of a mug. Pour hot milk over the bomb. Once it erupts, mix well and enjoy!
OR
- Pour hot milk in a mug. Place hot chocolate bomb in the hot milk. Once it melts, stir well and serve!
Feel free to add more or less milk to your liking. I hear that a splash of Bailey’s or Kahlua also goes incredibly well with hot chocolate!
Hot chocolate bombs are fun to make and fun to drink! Be patient and practice! It takes a bit of practice to get them just right! And in this case, practice makes hot chocolate, so it can’t be bad!

About Courtney
Baker | 80s Lover | Cookbook Author
Courtney is a self-taught home baker and cookbook author of “Girls Just Wanna Bake Cupcakes”. She loves to create new and unique recipes while simultaneously listening to 80s music.


Never Miss A Sweet Recipe!
Subscribe get the latest recipes, baking tips and more sent straight to your inbox!
Did you make this recipe or want to see more? Make sure to leave your review below and tag me on Instagram @CakeMeHomeTonight so I can see your creations!